How to Install Roofing Shingles
by siteadmin

Installing roofing shingles is a major project, but any knowledgeable do-it-yourselfer can accomplish it with the right tools and safety precautions. Using the proper technique makes it much easier to install the shingles correctly and prevent problems like leaks and blow offs.
It's important to follow the shingle manufacturer's instructions for exposure, offset (the lateral distance between shingles in successive courses), and nailing. This will ensure the roof has the strength necessary to resist wind damage.
Lay Out the Felt Paper
A roll of 15- or 30-pound roofing felt provides a protective barrier between the roof deck and the shingles. The felt is also a vapor barrier and helps shed water that makes it past the shingles. Felt is not a permanent solution to your roof, however. It should be replaced at least every five years.
Start with one corner of the roof, tack the felt securely in place and then roll out about 10 feet at a time, securing it with staples or nails with plastic washer heads. Aim to put fasteners about every 4-8 inches.
As you work, make sure the felt is flat and smooth. A rough surface could catch moisture and cause problems later. As you reach the eaves, cut the felt to fit around metal flashing edges on the vents and pipes. Continue rolling new rows of felt up to the peak, overlapping each by about three inches as you go.
Start with the Starter Course
The first row of shingles is called the starter course and should include the tabs that form the self-sealing adhesive strip. You should also install metal flashing around any protrusions on your roof, such as a chimney or skylight. If you already have flashing installed, make sure it is in good condition and does not show signs of corrosion or curling.
Start at the eave and work your way up to the roof ridge. If necessary, stagger the shingle rows according to the manufacturer's requirements.
When you reach the end of the roof, install a final shingle to cover the roof ridge. Center and bend the shingle over the ridge, then nail it in place. This shingle will help prevent water from seeping in at the peak of your roof. You should also finish off the project by installing the ridge vent, if needed.
Stagger the Shingles
There are a number of ways to install shingles, and each has advantages and disadvantages. One of the most common methods, called stagger or vertical racking, is typically faster than other methods.
To use this method, snap a chalk line for the first course of shingles and align it with the previous shingle's slit edge. Offset the next shingle up against the bottom side of the first by 6", and nail it into place. Continue in this fashion until you reach the ridge.
When you're working around a vent or other obstruction, make sure the shingle isn't riding up on the raised portion of the flashing and cover any exposed nail heads with dabs of roofing cement. You may also opt to lay a strip of WSU over the obstruction, which will provide extra protection against leaks. Whatever route you take, always follow the installation instructions on your shingles to get the best results. Getting this step right is crucial for a long-lasting roof.
Install the Rest of the Shingles
Once you’ve removed the existing shingles and taken all the necessary safety precautions for working on a roof, it’s time to start installing the roofing. The first decision to make is whether you’re going to use a nail gun or hand-nail each shingle. This will depend on the condition of the sheathing under the shingles and your comfort level with working at heights.
If you choose to use a nail gun, it’s best to follow the instructions on the shingle package to determine how many nails per shingle. Using too few nails could result in the shingles blowing off in high winds.
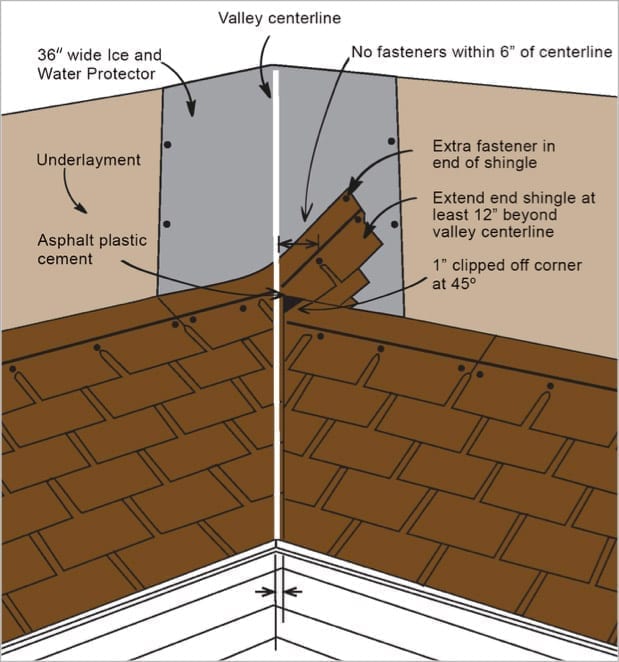
When you reach the ridge of the roof, bend single tab shingles (or special ridge shingles) over the ridge and nail them in place. Then, install a flashing around the vent opening and glue it with plastic roof cement. This is important to prevent water penetration and ice dams. To further protect against moisture, an ice and water membrane can be used in addition to the ridge vent system.
Roofing companies in Columbia md
Installing roofing shingles is a major project, but any knowledgeable do-it-yourselfer can accomplish it with the right tools and safety precautions. Using the proper technique makes it much easier to install the shingles correctly and prevent problems like leaks and blow offs. It's important to follow the shingle manufacturer's instructions for exposure, offset (the lateral…
Recent Posts
- Roofing Company Savannah Sheds Light on the Lifespan of Roofs: How Long Should a Roof Last?
- New Orleans Concreters Advocates for Stamped Concrete Driveways as the Ultimate Choice for Durability and Style
- Gutter Installation Jacksonville FL: Revolutionizing Home Protection
- The Comprehensive Guide to Gutters in Jacksonville FL
- The Comprehensive Guide to Gutters in Jacksonville FL
